Tuesday, August 31, 2021

Windsward House Tier Grid map

This is a map of all the various housing plots and tier level from the settlement in Windsward. Use it to find the specific housing plot with the tier level that you want to invest.


Housing tier grid for Windsward
Click on image to enlarge

Housing Tiers

Tier 1
  • Costs 5000
  • Fast Travel Cooldown: 240 minutes / 4 hours
  • Territory Standing Requirements: 10
  • Max Number of Total Housing Items without perks: 100
  • Max storage pieces: 1
  • Max number of pets: 5
  • Max number of lights: 4
Tier 2
  • Costs 10000
  • Fast Travel Cooldown: 180 minutes / 3 hours
  • Territory Standing Requirements: 15
  • Max Number of Total Housing Items without perks: 125
  • Max storage pieces: 2
  • Max number of pets: 6
  • Max number of lights: 6
Tier 3
  • Costs 15000
  • Fast Travel Cooldown: 150 minutes / 2.5 hours
  • Territory Standing Requirements: 20
  • Max Number of Total Housing Items without perks: 150
  • Max storage pieces: 3
  • Max number of pets:7
  • Max number of lights: 8
Tier 4
  • Costs 20000
  • Fast Travel Cooldown: 120 minutes / 2 hours
  • Territory Standing Requirements: 30
  • Max Number of Total Housing Items without perks: 200
  • Max storage pieces: 4
  • Max number of pets: 8
  • Max number of lights: 10


See other settlement house grids

Everfall
Housing tier grid for Everfall

Monarch's Bluff
Housing tier grid for Monarch's Bluff

Cutlass Key's
Housing tier grid for Cutless Keys

First Light
Housing tier grid for First Light

Reekwater
Housing tier grid for Reekwater

Brightwood
Housing tier grid for Brightwood

Weaver's Fen
Housing tier grid for Weavers Fen

Restless Shore
Housing tier grid for Restless Shore

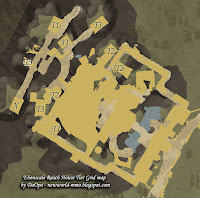
Ebonscale Reach
Housing tier grid for Ebonscale Reach

Mourningdale
Housing tier grid for Restless Shore

First Light House Tier Grid map

This is a map of all the various housing plots and tier level from the settlement in First Light. Use it to find the specific housing plot with the tier level that you want to invest.


Housing tier grid for First Light
Click on image to enlarge

Housing Tiers

Tier 1
  • Costs 5000
  • Fast Travel Cooldown: 240 minutes / 4 hours
  • Territory Standing Requirements: 10
  • Max Number of Total Housing Items without perks: 100
  • Max storage pieces: 1
  • Max number of pets: 5
  • Max number of lights: 4
Tier 2
  • Costs 10000
  • Fast Travel Cooldown: 180 minutes / 3 hours
  • Territory Standing Requirements: 15
  • Max Number of Total Housing Items without perks: 125
  • Max storage pieces: 2
  • Max number of pets: 6
  • Max number of lights: 6
Tier 3
  • Costs 15000
  • Fast Travel Cooldown: 150 minutes / 2.5 hours
  • Territory Standing Requirements: 20
  • Max Number of Total Housing Items without perks: 150
  • Max storage pieces: 3
  • Max number of pets:7
  • Max number of lights: 8
Tier 4
  • Costs 20000
  • Fast Travel Cooldown: 120 minutes / 2 hours
  • Territory Standing Requirements: 30
  • Max Number of Total Housing Items without perks: 200
  • Max storage pieces: 4
  • Max number of pets: 8
  • Max number of lights: 10


See other settlement house grids

Everfall
Housing tier grid for Everfall

Windsward
Housing tier grid for Windsward

Monarch's Bluff
Housing tier grid for Monarch's Bluff

Cutlass Key's
Housing tier grid for Cutless Keys

Reekwater
Housing tier grid for Reekwater

Brightwood
Housing tier grid for Brightwood

Weaver's Fen
Housing tier grid for Weavers Fen

Restless Shore
Housing tier grid for Restless Shore

Ebonscale Reach
Housing tier grid for Ebonscale Reach

Mourningdale
Housing tier grid for Restless Shore

Cutlass Key's House Tier Grid map

This is a map of all the various housing plots and tier level from the settlement in Cutlass Key's. Use it to find the specific housing plot with the tier level that you want to invest.


Housing tier grid for Cutlass Keys
Click on image to enlarge

Housing Tiers

Tier 1
  • Costs 5000
  • Fast Travel Cooldown: 240 minutes / 4 hours
  • Territory Standing Requirements: 10
  • Max Number of Total Housing Items without perks: 100
  • Max storage pieces: 1
  • Max number of pets: 5
  • Max number of lights: 4
Tier 2
  • Costs 10000
  • Fast Travel Cooldown: 180 minutes / 3 hours
  • Territory Standing Requirements: 15
  • Max Number of Total Housing Items without perks: 125
  • Max storage pieces: 2
  • Max number of pets: 6
  • Max number of lights: 6
Tier 3
  • Costs 15000
  • Fast Travel Cooldown: 150 minutes / 2.5 hours
  • Territory Standing Requirements: 20
  • Max Number of Total Housing Items without perks: 150
  • Max storage pieces: 3
  • Max number of pets:7
  • Max number of lights: 8
Tier 4
  • Costs 20000
  • Fast Travel Cooldown: 120 minutes / 2 hours
  • Territory Standing Requirements: 30
  • Max Number of Total Housing Items without perks: 200
  • Max storage pieces: 4
  • Max number of pets: 8
  • Max number of lights: 10


See other settlement house grids

Everfall
Housing tier grid for Everfall

Windsward
Housing tier grid for Windsward

Monarch's Bluff
Housing tier grid for Monarch's Bluff

First Light
Housing tier grid for First Light

Reekwater
Housing tier grid for Reekwater

Brightwood
Housing tier grid for Brightwood

Weaver's Fen
Housing tier grid for Weavers Fen

Restless Shore
Housing tier grid for Restless Shore

Ebonscale Reach
Housing tier grid for Ebonscale Reach

Mourningdale
Housing tier grid for Restless Shore

Monarch's Bluffs House Tier Grid map

This is a map of all the various housing plots and tier level from the settlement in Monarch's Bluffs. Use it to find the specific housing plot with the tier level that you want to invest.


Housing tier grid for Monarch's Bluffs
Click on image to enlarge

Housing Tiers

Tier 1
  • Costs 5000
  • Fast Travel Cooldown: 240 minutes / 4 hours
  • Territory Standing Requirements: 10
  • Max Number of Total Housing Items without perks: 100
  • Max storage pieces: 1
  • Max number of pets: 5
  • Max number of lights: 4
Tier 2
  • Costs 10000
  • Fast Travel Cooldown: 180 minutes / 3 hours
  • Territory Standing Requirements: 15
  • Max Number of Total Housing Items without perks: 125
  • Max storage pieces: 2
  • Max number of pets: 6
  • Max number of lights: 6
Tier 3
  • Costs 15000
  • Fast Travel Cooldown: 150 minutes / 2.5 hours
  • Territory Standing Requirements: 20
  • Max Number of Total Housing Items without perks: 150
  • Max storage pieces: 3
  • Max number of pets:7
  • Max number of lights: 8
Tier 4
  • Costs 20000
  • Fast Travel Cooldown: 120 minutes / 2 hours
  • Territory Standing Requirements: 30
  • Max Number of Total Housing Items without perks: 200
  • Max storage pieces: 4
  • Max number of pets: 8
  • Max number of lights: 10


See other settlement house grids

Everfall
Housing tier grid for Everfall

Windsward
Housing tier grid for Windsward

Cutlass Key's
Housing tier grid for Cutless Keys

First Light
Housing tier grid for First Light

Reekwater
Housing tier grid for Reekwater

Brightwood
Housing tier grid for Brightwood

Weaver's Fen
Housing tier grid for Weavers Fen

Restless Shore
Housing tier grid for Restless Shore

Ebonscale Reach
Housing tier grid for Ebonscale Reach

Mourningdale
Housing tier grid for Restless Shore
Friday, August 27, 2021

Where to find nightcrawler bait?

If you are doing a town board quest that needs you to acquire nightcrawler bait then your best bet to obtaining it will be from searching for and looting flint you find on the ground. Here is what flint looks like and how it can give you nightcrawler bait time to time.  

how to get nightcrawler bait


If you do not get a night crawler bait on your first attempt, keep trying other flint rocks that you can find all over the place in New World.


Shattered Mountain Named NPCs lcations map

Shown here are all the locations of named npcs in Shattered Mountain from New World. Use this map to find the named enemies for achievements and possible loot drops. These named npcs are also targets for a variety of quests for towns and factions.

Shattered Mountain named npc locations map
(click on image to enlarge)

Legend:

  1. Caminus Gate Lord
    • Level 61
    • Heavy - Elite Boss
    • Type: Corrupted
  2. Overseer Levy
    • Level 61
    • Pistoleer - Elite Boss
    • Type: Damned / Corrupted
  3. Pit Lord Daehi
    • Level 62
    • Heavy
    • Type: Corrupted
  4. Tzi-Wang the Immovable
    • Level 62
    • Javelineer
    • Type: Ancient Guardian
  5. Dau-Shen the Unstoppable
    • Level 62
    • Mage
    • Type: Ancient Guardian
  6. Fetidfang Ursine
    • Level 64
    • Bear - Elite
    • Type: Beast
  7. Fay the Last Protector
    • Level 64
    • Dryad Prowler
    • Type: Angry Earth
  8. Archmagister Vocus
    • Level 64
    • Priest - Elite
    • Type: Damned / Corrupted
  9. Artifex Faetum
    • Level 65
    • Priest - Elite
    • Type: Damned / Corrupted
  10. Disciple of Disorder
    • Level 65
    • Priest - Elite
    • Type: Damned / Corrupted
  11. Captain Thorpe
    • Level 66
    • Long Swordsman Commander - Elite Boss
    • Type: Damned / Corrupted

Great Cleave Named NPCs lcations map

Shown here are all the locations of named npcs in Great Cleave from New World. Use this map to find the named enemies for achievements and possible loot drops. These named npcs are also targets for a variety of quests for towns and factions.

Great Cleave named npc locations map
(click on image to enlarge)

Legend:

  1. Colonel Sauquillo
    • Level 50
    • Long Swordsman
    • Type: Damned / Corrupted
  2. Legatus General Patrick
    • Level 50
    • Long Swordsman Commander - Elite
    • Type: Damned / Corrupted
  3. Deeppit Abomination
    • Level 43
    • Elite
    • Type: Corrupted
  4. Foreman Robertson
    • Level 42
    • Rifleman
    • Type: Damned / Corrupted
  5. Captain Patricia
    • Level 42
    • Rifleman
    • Type: Damned / Corrupted
  6. Abraxas the Vicious
    • Level 48
    • Grunt
    • Type: Withered
  7. Ironjaw
    • Level 45
    • Alligator - Elite
    • Type: Beast
  8. Mozrul the Herald
    • Level 60
    • Ogre - Elite
    • Type: Corrupted
  9. High Priest Oseguera
    • Level 60
    • Priest - Elite
    • Type: Damned / Corrupted