Monday, November 8, 2021

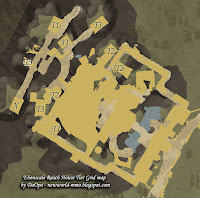
Mourningdale House Tier Grid Map

This is a map of all the various housing plots and tier level from the settlement in Mourningdale. Use it to find the specific housing plot with the tier level that you want to invest.


Housing tier grid for Mourningdale
Click on image to enlarge

Housing Tiers

Tier 1
  • Costs 5000
  • Fast Travel Cooldown: 240 minutes / 4 hours
  • Territory Standing Requirements: 10
  • Max Number of Total Housing Items without perks: 100
  • Max storage pieces: 1
  • Max number of pets: 5
  • Max number of lights: 4
Tier 2
  • Costs 10000
  • Fast Travel Cooldown: 180 minutes / 3 hours
  • Territory Standing Requirements: 15
  • Max Number of Total Housing Items without perks: 125
  • Max storage pieces: 2
  • Max number of pets: 6
  • Max number of lights: 6
Tier 3
  • Costs 15000
  • Fast Travel Cooldown: 150 minutes / 2.5 hours
  • Territory Standing Requirements: 20
  • Max Number of Total Housing Items without perks: 150
  • Max storage pieces: 3
  • Max number of pets:7
  • Max number of lights: 8
Tier 4
  • Costs 20000
  • Fast Travel Cooldown: 120 minutes / 2 hours
  • Territory Standing Requirements: 30
  • Max Number of Total Housing Items without perks: 200
  • Max storage pieces: 4
  • Max number of pets: 8
  • Max number of lights: 10


See other settlement house grids

Everfall
Housing tier grid for Everfall

Windsward
Housing tier grid for Windsward

Monarch's Bluff
Housing tier grid for Monarch's Bluff

Cutlass Key's
Housing tier grid for Cutless Keys

First Light
Housing tier grid for First Light

Reekwater
Housing tier grid for Reekwater

Brightwood
Housing tier grid for Brightwood

Weaver's Fen
Housing tier grid for Weavers Fen

Ebonscale Reach
Housing tier grid for Ebonscale Reach
Wednesday, October 13, 2021

Brimstone Sands Map

Shown here is a resource, npc, monster location map for the Brimstone Sands region in New World.

brimstone sands location and resource map

Landmarks / Point of Interest
  1. Ancient's Rise
  2. Barren Wastes
  3. Searing Sands
  4. Scorched Battlefield
  5. Windswept Highlands
  6. Come data coming soon.
Resources

Ores / Mining
  • Iron
    • Marked on map with this color:     
    • Low chance to get the following:
      • Flawed Gems and higher tier types
      • Fae Iron
      • Sliver, Chunk, Shard of Cobalt, Crystal
      • Small Quartz Crystal
  • Silver
    • Marked on map with this color:     
    • Gatherable at 10, Tracked at 35
    • Low chance to get the following:
      • Gems
      • Small Quartz Crystal
  • Gold
    • Marked on map with this color:     
    • Gatherable at 45, Tracked at 70
    • Low chance to get the following:
      • Gems, Brilliant / Pristine Gems
      • Small Quartz Crystal
  • Starmetal
    • Marked on map with this color:     
    • Gatherable at 100, Tracked at 125
    • Low chance to get the following:
      • Gems
      • Sliver, Chunk, Shard of Cobalt, Crystal
      • Small Quartz Crystal
  • Lodestone
    • Marked on map with this color:     
    • Gatherable at 105, Tracked at 155
    • Low chance to get the following:
      • Shard of Adamant, Adderstone
  • Platinum
    • Marked on map with this color:     
    • Gatherable at 110, Tracked at 135
    • Low chance to get the following:
      • Brilliant, Pristine Gems
      • Small Quartz Crystal
  • Orichalcum
    • Marked on map with this color:       and a yellow outer glow
    • Gatherable at 175, Tracked at 200
    • Low chance to get the following:
      • Brilliant, Pristine Gems
      • Sliver, Chunk, Shard of Cobalt, Crystal, Sparkmetal
      • Small Quartz Crystal
      • Void Ore
      • Cinnabar
      • Tolvium

Alchemy Stones - can be mined at 50, tracked at 75.

  • Blightcrag
    • Marked on map as D with a pink outer glow
    • Yields
      • Death Mote
    • Low chance to get the following:
      • Putrid Lodestone
  • Earthcrag
    • Marked on map as E with a light green outer glow
    • Yields
      • Earth Mote
    • Low chance to get the following:
      • Loamy Lodestone
  • Soulspire
    • Marked on map as S with a purple outer glow
    • Yields
      • Soul Mote
    • Low chance to get the following:
      • Crystalline Lodestone
  • Springstone
    • Marked on map as W with a light green outer glow
    • Yields
      • Water Mote
    • Low chance to get the following:
      • Freezing Lodestone

Wood / Logging

  • Wyrdwood
    • Marked on map with this color:     
    • Gatherable at 100, Tracked at 125
    • Low chance to get the following:
      • Softwood Tree Sap
      • Drop, Vial of Wyrdwood Sap
      • Sliver, Shard, Chunk of Wyrdwood Resin
      • Whisperwood
      • Quillbark

Plants / Harvesting

  • Hemp
    • Marked on map with this color:      
    • Yields
      • Fibers
    • Low chance to get the following:
      • Dead Dryad Vine
      • Drop of Azalea Nectar
      • Shadecloth
      • Phasefiber
      • Verbena Stem, Leaf, Flower
  • Herbs
    • Marked on map with this color:     
    • Yields
      • Hyssop
    • Low chance to get the following:
      • Basil
      • Garlic
      • Tarragon
  • Silkweed
    • Marked on map with this color:     
    • Yields
      • Silk Threads
    • Low chance to get the following:
      • Dead Dryad Vine
      • Vial of Azalea Nectar
      • Verbena Stem, Leaf, Flower
      • Glintstrands
      • Scalecord
  • Wirefiber
    • Marked on map with this color:      
    • Yields
      • Wirefiber
    • Low chance to get the following:
      • Dead Dryad Vine
      • Draught of Azalea Nectar
      • Verbena Stem, Leaf, Flower
      • Blisterweave
      • Scalecloth

Foods

  • Berry
    • Marked on map as R
  • Blueberry
    • Marked on map as B
  • Broccoli
    • Marked on map as O
  • Cabbage
    • Marked on map as G
  • Carrots
    • Marked on map as C
  • Corn
    • Marked on map as K
  • Cranberries
    • Marked on map as U
  • Honey
    • Marked on map as H
  • Nuts
    • Marked on map as N
  • Potatoes
    • Marked on map as P
  • Squash
    • Marked on map as Q
  • Strawberries
    • Marked on map as T

Other
Custom map filters showing only turkey nest, saltpeter.

  • Turkey Nest
    • Yields
      • Feathers
      • Egg
  • Saltpeter
    • Marked on map with this color     

Magical Plants - gatherable at 30, tracked at 45.

  • Shockbulb
    • Marked on map as A
    • Yields
      • Air Mote
    • Low chance to get the following:
      • Shockbulb Steam
      • Shockbulb Leaf
      • Shockbulb Flower
  • Blightroot
    • Marked on map as D
    • Yields
      • Death Mote
    • Low chance to get the following:
      • Blightroot Stem
      • Blightroot Leaf
      • Blightroot Flower
  • Earthspine
    • Marked on map as E
    • Yields
      • Earth Mote
    • Low chance to get the following:
      • Earthspine Stem
      • Earthspine Leaf
      • Earthspine Flower
      • Sliver, Shard, Chunk of Enchanted Earth
  • Dragonglory
    • Marked on map as F
    • Yields
      • Fire Mote
    • Low chance to get the following:
      • Dragonglory Stem
      • Dragonglory Leaf
      • Dragonglory Flower
  • Lifebloom
    • Marked on map as L
    • Yields
      • Life Mote
    • Low chance to get the following:
      • Lifebloom Stem
      • Lifebloom Leaf
      • Lifebloom Flower
  • Soulsprout
    • Marked on map as S
    • Yields
      • Soul Mote
    • Low chance to get the following:
      • Soulsprout Stem
      • Soulsprout Leaf
      • Soulsprout Flower
  • Rivercress
    • Marked on map as W
    • Yields
      • Water Mote
    • Low chance to get the following:
      • Rivercress Stem
      • Rivercress Leaf
      • Rivercress Flower

Magical Creatures - tracked at 175.

  • Blightmoth
    • Marked on map as D with a        outer glow
    • Yields
      • Death Mote
    • Low chance to get the following:
      • Blightmoth Dust
  • Lifemoth
    • Marked on map as L with a light orange outer glow
    • Yields
      • Life Mote
    • Low chance to get the following:
      • Lifemoth Eyes
  • Soulwyrm 
    • Marked on map as S with a light orange outer glow
    • Yields
      • Soul Mote
    • Low chance to get the following:
      • Soulwyrm Tongue

Dyes - marked on the map as X

  • Prismabloom
    • Can only be found in Brimstone Sands in many different areas, we will be adding markers on this in the future.
Fungus - mushrooms are very abounded, some maybe marked as J on the map.
  • N/A
    • Can be found many different areas in Brimstone Sands, we will be adding markers on this in the future.


Wild Life - can be found around landmarks, and in the plain biome areas 
  • Coming soon

Misc

Provisions you can find in this territory for cooking include the following:

  • Apple
  • Milk
  • Salt

If you notice any issues with the map above or data fill free to comment.

Monday, September 27, 2021

An error occured while installing New World (invalid platform)

Trying to download the preload for New World is producing the following "An error occurred while installing New World (invalid platforum).

New World invalid platform error

Solution to the problem,  Close out Steam client and restart it will fix this issue if you have it on your system.

Sunday, September 26, 2021

Mining guide

One of the main gathering activities in New World is mining. Here are some quick tidbits on the mining skill from tools to perks, food buffs and other helpful information. To get started in mining you will need a mining tool.

Mining Guide by DaOpa

Mining Tools List

  • Flint Pickaxe
    • Tier 1
    • Equippable at level 0
    • Gear Score 100
    • Gathers Speed 100%
  • Iron Pickaxe
    • Tier 2
    • 1 Mining Perk slot
    • Equippable at level 3-20
    • Gear Score 200-300
    • Gathers Speed 125-250%
  • Steel Pickaxe
    • Tier 3 
    • 2 Mining Perk slots
    • Equippable at level 18-37
    • Gear Score 300-400
    • Gathers Speed 250-350%
  • Starmetal Pickaxe
    • Tier 4 
    • 3 Mining Perk slots
    • Equippable at level 37-60
    • Gear Score 400-500
    • Gathers Speed 350-450%
  • Orichalcum Pickaxe
    • Tier 5
    • 3 Mining Perk slots
    • Equippable at level 60
    • Gear Score 500-600
    • Gathers Speed 450-550%
Perks that can be put on tools to assist with various bonuses to mining.
  • Azoth Extraction
    30 to 40% chance when gathering to a  node to gain 1 Azoth
  • Durability
    +25 to 70% durability
  • Gathering Alacrity
    When you finish gathering a node gain 3s of 50% haste
    • Special Resource which enables this perk during crafting
      • Small Elk Hoof
  • Mining Luck
    When mining gain 2% - 9.3% chance at finding rare items
  • Mining Yield
    Mining yields 10% - 19% more resources
  • Prospector's Discipline
    Gain 3% - 9.4% more mining experience

Gear Perks

For Armor

  • Reinforced Mining Luck
    When mining gain 2% - 5% chance at finding rare items.

For Amulets

  • Adored Mining Luck
    When mining gain 5% - 9.5% chance at finding rare items

For Bags

  • Extra Pockets
    You can hold 50 - 95 more weight
  • Quarryman's Burden
    Reduce the weight of stone, blocks, gems and pickaxes by 5% - 10%.
  • Prospector's Burden
    Reduce the weight of ores, ingots and pickaxes by 5% - 10%.

Mining Trophies - these provide luck bonuses but require a house in a settlement to use.

  • Minor Mining Trophy
    Increases your luck when mining by 500 points
  • Basic Mining Trophy
    Increases your luck when mining by 1000 points
  • Major Mining Trophy
    Increases your luck when mining by 1500 points

Consumables - these provide short term buffs to mining activities.

Foods

  • Roasted Potatoes
    Increases your luck when mining by 1000 points for 20 minutes
    • Useable at any level
  • Herb-roasted Potatoes
    Increases your luck when mining by 1400 points for 25 minutes
    • Useable at level 5
  • Boiled Potatoes
    Increases your luck when mining by 1700 points for 30 minutes
    • Useable at level 20
  • Poultry with Roasted Potatoes
    Increases your luck when mining by 1900 points for 35 minutes
    • Useable at level 40
  • Salted Roasted Vegetables
    Increases your luck when mining by 2000 points for 40 minutes
    • Useable at level 60

Potions

  • Weak Proficiency Booster
    Increases the amount of resources gathered by 5% for 10 minutes.
    • Useable at level 5
  • Common Proficiency Booster
    Increases the amount of resources gathered by 7% for 15 minutes.
    • Useable at level 20
  • Strong Proficiency Booster
    Increases the amount of resources gathered by 10% for 20 minutes.
    • Useable at level 40
  • Powerful Proficiency Booster
    Increases the amount of resources gathered by 15% for 30 minutes.
    • Useable at level 60

Strength - bonuses for mining, as you spend points into the strength attribute at certain levels you get a bonus.

  • 50
    • +10% mining speed
  • 100
    • +20 encumbrance
  • 150
    • -10% in weight of mined items
  • 200
    • +10% mining speed
  • 250
    • +10% yield when mining
  • 300
    • 25% chance to mine an ore with a single swing

Mining Nodes


Iron Node
Iron can be mined at any time and you will start to track it when you obtain mining level 25.
Iron Resource maps by territory

Silver
Silver can be mined at level 10 and you will start to track it when you obtain mining level 35.

Silver Resource maps by territory
Seeping Stone / Oil
Seeping Stone / Oil can be mined at level 20 and you will start to track it when you obtain mining level 45.

Seeping Stone / Oil Resource maps by territory
Gold
Gold can be mined at level 45 and you will start to track it when you obtain mining level 70.

Gold Resource maps by territory

Starmetal
Starmetal can be mined at level 100 and you will start to track it when you obtain mining level 125.

Starmetal Resource maps by territory
Lodestone
Lodestone can be mined at level 105 and you will start to track it when you obtain mining level 155.

Lodestone Resource maps by territory
Platinum can be mined at level 110 and you will start to track it when you obtain mining level 135.

Platinum Resource maps by territory
Orichalcum

Orichalcum can be mined at level 110 and you will start to track it when you obtain mining level 135.

Orichalcum Resource maps by territory


Alchemy Stones


Alchemy stones can be mined at level 50 and you will start to track it when you obtain mining level 75.

Alchemy Stones type and resource maps by territory
.

Town Board exploit for Everfall

Use this page to exploit the explore quests at Everfall town board from New World. This is one exploit you can do with out fear of getting banned because its just a location guide to chest that helps you do the missions faster then normal.

So read the quest details which will tell you which landmark you need to search chests for items. Use the map to see the number and then check below verify the name then use the link to the chest location page. If you do not see a link to a chest location page its because the landmark is very small and getting the chests will be extremely easy.

everfall locations map
Landmarks / Point of Interest
  1. Huang's Hammer
  2. The Temperance
  3. Beringer's Boon
  4. Harpy of Henninger
  5. Drowned Cavern
  6. Boar Infestation
  7. Everfall Watchtower
  8. Fallowhill Farm
  9. Orion
  10. Olcott Family Farm
  11. Draco
  12. Shattered Obelisk
  13. Canis
  14. Ancient Bridge
  15. Lacerta
  16. Monoceros
  17. Carina
  18. Sirius
  19. Nettlerest
  20. Stonetooth Terrance
  21. Riverworn Grotto
  22. Hercules
  23. Arcturus
  24. Leo
  25. Midnight Den
  26. Norma
  27. Lupus
  28. Perseus
  29. Crawtick Cave
  30. Bradbury Fields
  31. Canary Mine
  32. Canery Camp
  33. Meadow Lake Fishery
  34. Kelleher Farmstead
  35. Daybreak Borough
  36. Longshadow Enclave
  37. Ursa
  38. Ebonrock Cavern
  39. Ebonrock Quarry

Additional maps
Everfall Resource Map - shows landmarks, resource nodes and other helpful information.

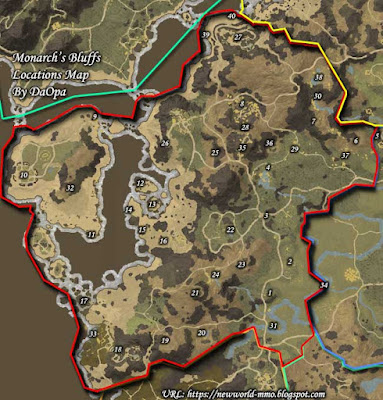
Town Board exploit for Monarch's Bluffs

Use this page to exploit the explore quests at Monarch's Bluffs town board from New World. This is one exploit you can do with out fear of getting banned because its just a location guide to chest that helps you do the missions faster then normal.

So read the quest details which will tell you which landmark you need to search chests for items. Use the map to see the number and then check below verify the name then use the link to the chest location page. If you do not see a link to a chest location page its because the landmark is very small and getting the chests will be extremely easy.

monarchs bluffs locations map

Landmarks / Point of Interest

  1. Arruda Ranch
  2. Fertile Fields / Fong Family Orchard / Tres Campos
  3. Farside Township / Moonshade
  4. Antares
  5. Hydrus
  6. Alpha Wolf Den
  7. Howltower Hollow
  8. Mines de Miclot
  9. Reedgill Fishery
  10. Fort
  11. Abadier's Anger
  12. Capili's Coronation
  13. The Rise of Poseidon
  14. Hurley's Hope
  15. Bounty of Boehm
  16. Drowned Cavern / Turtlespit Cave
  17. The Montore Expedition
  18. Deadman's Cove
  19. Alpha Wolf Den
  20. Brigand Bastion
  21. Bear Den
  22. Lakeside Farm
  23. Alpha Wolf Den
  24. Pollux
  25. Hurtfang Hole
  26. Bayhowl Burrow
  27. Traitor's Hold
  28. Devil's Pit
  29. Achernar
  30. Grand Stairs
  31. Infested Monolith
  32. Turkey Leg Hallow
  33. Nautilus of Nunez
  34. Fisherman's Bend
  35. Adamant Mine
  36. Offal Grotto
  37. Chason Steep
  38. Alioth
  39. The Grey Mist
  40. The Dagger

Additional maps
Monarch's Bluffs Resource Map - shows landmarks, resource nodes and other helpful information.

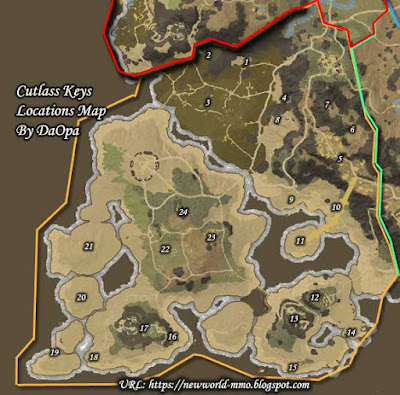
Town Board exploit for Cutlass Keys

Use this page to exploit the explore quests at Cutlass Keys town board from New World.  This is one exploit you can do with out fear of getting banned because its just a location guide to chest that helps you do the missions faster then normal.

So read the quest details which will tell you which landmark you need to search chests for items. Use the map to see the number and then check below verify the name then use the link to the chest location page. If you do not see a link to a chest location page its because the landmark is very small and getting the chests will be extremely easy.

cutlass keys locations map
Landmarks / Point of Interest
  1. Snaggletooth Burrow
  2. Castaway's Colony / Deadman's Hideaway
  3. Flatfish Fishery
  4. Brighteye Den
  5. Spiti Ruins
  6. Highpass Mining Camp
  7. Highpass Cavern
  8. Hidden Paw / Rothoard Hollow
  9. Yafda Steps
  10. Gefyra Bridge
  11. Malocchio
  12. Pullpatch Cover
  13. Stone Skull Fort
  14. Clearmon's Doubt
  15. Festering Fishery
  16. Salty Snail Fishery
  17. Pond Scum Fort
  18. Fishbone Village
  19. Unbounded Island
  20. Lightning Fields
  21. Ticking Waterway
  22. Rusty Spoon Camp
  23. Fort Ramos
  24. Cave of Tithing
Additional maps
Cutlass Keys Resource Map - shows landmarks, resource nodes and other helpful information.

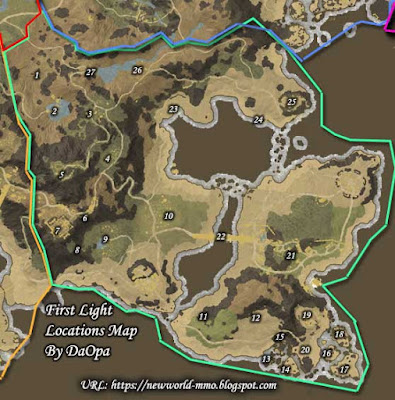
Town Board exploit for First Light

Use this page to exploit the explore quests at First Light town board from New World.  This is one exploit you can do with out fear of getting banned because its just a location guide to chest that helps you do the missions faster then normal.

So read the quest details which will tell you which landmark you need to search chests for items. Use the map to see the number and then check below verify the name then use the link to the chest location page. If you do not see a link to a chest location page its because the landmark is very small and getting the chests will be extremely easy.

first light locations map
Landmarks / Point of Interest
  1. Graymane Burrow
  2. Forellac
  3. Letum's Pick
  4. Hilltop Encampment
  5. Sleepy Tallow
  6. Pyrgos Nao
  7. Elafry Pyrgo
  8. Howling Falls
  9. Hatchburg Fishery
  10. Dayspring Mills
  11. Fullmoon Dent
  12. Boar Infestation
  13. Standing Shallows
  14. Ducan's Docket
  15. Mutineer's Grotto
  16. Kain's Knot
  17. Blithe's Blunder
  18. Sal's Schooner
  19. Tideswallow Cave
  20. First Light Watchtower
  21. Saircor Bridge
  22. Nyhart's Anchorage
  23. Renovatio
  24. Coffman's Redoubt
  25. Campbell's Rest
  26. Clearwater Bend

Additional maps
First Light Resource Map - shows landmarks, resource nodes and other helpful information.

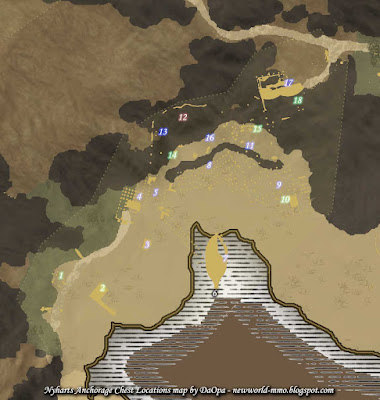
Nyhart's Anchorage chest locations

Shown here are all the various supply chests you can gather from "Nyhart's Anchorage" in First Light.

Nyhart's Anchorage chest locations
Nyharts Anchorage chest locations map
(click on image to enlarge)

Legend:

  1. Provisions Crate

  2. Provisions Crate

  3. Supply Crate

  4. Supply Cache

  5. Supply Crate

  6. Supply Stockpile

  7. Supply Crate


    Supply Crate

  8. Supply Crate

  9. Supply Crate

  10. Provisions Crate

  11. Supply Crate

  12. Alchemy Crate

  13. Supply Stockpile

  14. Provisions Stockpile

  15. Provisions Crate

  16. Supply Stockpile

  17. Supply Cache

  18. Provisions Crate

Saturday, September 25, 2021

Hatchburg Fishery chest locations

Shown here are all the various supply chests you can gather from "Hatchburg Fishery" in First Light.

Hatchburg Fishery chest locations

Hatchburg Fishery chest locations map
(click on image to enlarge)

Legend:
  1. Supply Cache

  2. Supply Crate

  3. Supply Crate

  4. Supply Crate

  5. Supply Stockpile

  6. Supply Stockpile

  7. Supply Crate

  8. Supply Crate

  9. Supply Crate