Wednesday, September 8, 2021

Mourningdale Map

Shown here is a resource, npc, monster location map for the Mourningdale region in New World.

Mourningdale resource and locations map

Landmarks / Point of Interest
  1. Serpans
  2. Sorrowsilt Ridge
  3. Corvus
  4. Subra
  5. Marsic
  6. Karaka
  7. Menkar
  8. Porridgepot
  9. Fomax
  10. Smuggler's Cave
  11. Izar
  12. Guera's Curse
  13. Nembus
  14. Mourning Bridge
  15. Crux
  16. Vela
  17. Stephen's Claim
  18. Lunaryth
  19. Broken Promise
  20. Sunadire
  21. Haedus
  22. Echowhine Hollow
  23. Monument Cave
  24. Shambhala
  25. Amphus
  26. Lesath
  27. Pueblo Culto Nunez
  28. New Balefire
  29. Bronzethroat Burrow
  30. Propus
  31. Sagitta
  32. Fangsnap's Den
  33. Ceremony
  34. Foulroot
  35. Cragview
  36. Hibbotsfeld
  37. Ramshead Cave
  38. Grus
  39. Presage Pier
  40. Scorpius
Resources

Ores / Mining
Custom map filters showing only iron, silver, gold, starmetal, lodestone, platinum, orichalcum.
  • Iron
    • Marked on map with this color:     
    • Low chance to get the following:
      • Flawed Gems and higher tier types
      • Fae Iron
      • Sliver, Chunk, Shard of Cobalt, Crystal
      • Small Quartz Crystal
  • Silver
    • Marked on map with this color:     
    • Gatherable at 10, Tracked at 35
    • Low chance to get the following:
      • Gems
      • Small Quartz Crystal
  • Gold
    • Marked on map with this color:     
    • Gatherable at 45, Tracked at 70
    • Low chance to get the following:
      • Gems, Brilliant / Pristine Gems
      • Small Quartz Crystal
  • Starmetal
    • Marked on map with this color:     
    • Gatherable at 100, Tracked at 125
    • Low chance to get the following:
      • Gems
      • Sliver, Chunk, Shard of Cobalt, Crystal
      • Small Quartz Crystal
  • Lodestone
    • Marked on map with this color:     
    • Gatherable at 105, Tracked at 155
    • Low chance to get the following:
      • Shard of Adamant, Adderstone
  • Platinum
    • Marked on map with this color:     
    • Gatherable at 110, Tracked at 135
    • Low chance to get the following:
      • Brilliant, Pristine Gems
      • Small Quartz Crystal
  • Orichalcum
    • Marked on map with this color:       and a yellow outer glow
    • Gatherable at 175, Tracked at 200
    • Low chance to get the following:
      • Brilliant, Pristine Gems
      • Sliver, Chunk, Shard of Cobalt, Crystal, Sparkmetal
      • Small Quartz Crystal
      • Void Ore
      • Cinnabar
      • Tolvium

Alchemy Stones - can be mined at 50, tracked at 75.
Custom map filters showing only shockspire, earthcrag, scorchstone, lifejewel, soulspire, springstone.

  • Shockspire
    • Marked on map as A with a pink outer glow
    • Yields
      • Air Mote
    • Low chance to get the following:
      • Shocking Lodestone
      • Sliver, Shard, Chunk of Thunderstone
  • Earthcrag
    • Marked on map as E with a light green outer glow
    • Yields
      • Earth Mote
    • Low chance to get the following:
      • Loamy Lodestone
  • Scorchstone
    • Marked on map as F with a purple outer glow
    • Yields
      • Fire Mote
    • Low chance to get the following:
      • Molten Lodestone
      • Sliver, Shard, Chunk of Niter
  • Lifejewel
    • Marked on map as L with a purple outer glow
    • Yields
      • Life Mote
    • Low chance to get the following:
      • Gleaming Lodestone
  • Soulspire
    • Marked on map as S with a purple outer glow
    • Yields
      • Soul Mote
    • Low chance to get the following:
      • Crystalline Lodestone
  • Springstone
    • Marked on map as W with a light green outer glow
    • Yields
      • Water Mote
    • Low chance to get the following:
      • Freezing Lodestone

Wood / Logging
Custom map filters showing only ironwood, wyrdwood.

  • Ironwood
    • Marked on map with this color:     
    • Gatherable at 175, Tracked at 200
    • Low chance to get the following:
      • Softwood Tree Sap
      • Shard, Draught of Ironwood Sap
      • Wildwood
      • Barbvine
  • Wyrdwood
    • Marked on map with this color:     
    • Gatherable at 100, Tracked at 125
    • Low chance to get the following:
      • Softwood Tree Sap
      • Drop, Vial of Wyrdwood Sap
      • Sliver, Shard, Chunk of Wyrdwood Resin
      • Whisperwood
      • Quillbark

Plants / Harvesting
Custom map filters showing only hemp, herbs, silkweed, wirefiber, azoth spring.

  • Hemp
    • Marked on map with this color:      
    • Yields
      • Fibers
    • Low chance to get the following:
      • Dead Dryad Vine
      • Drop of Azalea Nectar
      • Shadecloth
      • Phasefiber
      • Verbena Stem, Leaf, Flower
  • Herbs
    • Marked on map with this color:     
    • Yields
      • Hyssop
    • Low chance to get the following:
      • Dill
      • Parsley
      • Peppercorn
      • Saffron
  • Silkweed
    • Marked on map with this color:     
    • Yields
      • Silk Threads
    • Low chance to get the following:
      • Dead Dryad Vine
      • Vial of Azalea Nectar
      • Verbena Stem, Leaf, Flower
      • Glintstrands
      • Scalecord
  • Wirefiber
    • Marked on map with this color:      
    • Yields
      • Wirefiber
    • Low chance to get the following:
      • Dead Dryad Vine
      • Draught of Azalea Nectar
      • Verbena Stem, Leaf, Flower
      • Blisterweave
      • Scalecloth
  • Azoth Spring
    • Marked on map with this color:     
    • Yields
      • Azoth Water

Foods
Custom map filters showing only blueberry, honey.

  • Blueberry
    • Marked on map as B
  • Honey
    • Marked on map as H

Other

  • Saltpeter
    • Marked on map with this color     

Magical Plants - gatherable at 30, tracked at 45.

  • None

Magical Creatures - tracked at 175.
Custom map filters showing only lightning beetle, earthshell turtle, salamander snail, lifemoth, soulwyrm, floating spinefish.

  • Lightning Beetle
    • Marked on map as A with a light orange outer glow
    • Yields
      • Air Mote
    • Low chance to get the following:
      • Lightning Beetle
  • Earthshell Turtle with a light orange outer glow
    • Marked on map as E
    • Yields
      • Earth Mote
    • Low chance to get the following:
      • Earthshell Tail
  • Salamander Snail
    • Marked on map as F with a light orange outer glow
    • Yields
      • Fire Mote
    • Low chance to get the following:
      • Salamander Slime
  • Lifemoth
    • Marked on map as L with a light orange outer glow
    • Yields
      • Life Mote
    • Low chance to get the following:
      • Lifemoth Eyes
  • Soulwyrm 
    • Marked on map as S with a light orange outer glow
    • Yields
      • Soul Mote
    • Low chance to get the following:
      • Soulwyrm Tongue
  • Floating Spinefish
    • Marked on map as W with a light orange outer glow
    • Yields
      • Water Mote
    • Low chance to get the following:
      • Spinefish Fins

Dyes - marked on the map as X

  • Yellow Prismabloom
    • Can be found Mourningdale in one area.
Fungus - mushrooms are very abounded, some maybe marked as J on the map.
  • Flowering Tubcap
    • N/A.
  • Toadpot
    • N/A

Wild Life - can be found around landmarks, and in the plain biome areas
  • Sheep
Misc

Provisions can be found in this territory for cooking include the following:
  • Cauliflower
  • Milk
  • Orange
  • Tomato

Weaver's Fen Map

Shown here is a resource, npc, monster location map for the Weaver's Fen region in New World.

Weaver's Fen resource and locations map


Landmarks / Point of Interest
  1. Outlook Mill
  2. Wretched Shallows
  3. Fisher's End
  4. Aria Village
  5. Gracewater
  6. Hazel's Cave
  7. Taryville
  8. Angler's Doom
  9. Ursus Hortus
  10. South Vega Bridge
  11. Piscarian Fishery
  12. La Escamilla
  13. Canopus
  14. Karburg
  15. Periville
  16. Swampwater Fishery
  17. North Vega Bridge
  18. Fenton Hamlet
  19. Broadpaw Den
  20. Slobbering Cave
  21. Navarro's Kitchen
  22. Dusty Paw Burrow
  23. Aqua Acadia
  24. Andrometus
  25. Lepus
Resources

Ores / Mining
Custom map filters showing only iron, silver, oil, gold, starmetal, lodestone, platinum.
  • Iron
    • Marked on map with this color:     
    • Low chance to get the following:
      • Flawed Gems and higher tier types
      • Fae Iron
      • Sliver, Chunk, Shard of Cobalt, Crystal
      • Small Quartz Crystal
  • Silver
    • Marked on map with this color:     
    • Gatherable at 10, Tracked at 35
    • Low chance to get the following:
      • Gems
      • Small Quartz Crystal
  • Seeping Stone / Oil
    • Marked on map with this color:     
    • Gatherable at 20, Tracked at 45
  • Gold
    • Marked on map with this color:     
    • Gatherable at 45, Tracked at 70
    • Low chance to get the following:
      • Gems, Brilliant / Pristine Gems
      • Small Quartz Crystal
  • Starmetal
    • Marked on map with this color:     
    • Gatherable at 100, Tracked at 125
    • Low chance to get the following:
      • Gems
      • Sliver, Chunk, Shard of Cobalt, Crystal
      • Small Quartz Crystal
  • Lodestone
    • Marked on map with this color:     
    • Gatherable at 105, Tracked at 155
    • Low chance to get the following:
      • Shard of Adamant, Adderstone
  • Platinum
    • Marked on map with this color:     
    • Gatherable at 110, Tracked at 135
    • Low chance to get the following:
      • Brilliant, Pristine Gems
      • Small Quartz Crystal

Alchemy Stones - can be mined at 50, tracked at 75.
Custom map filters showing only shockspire, blightcrag, earthcrag, lifejewel, soulspire, springstone.

  • Shockspire
    • Marked on map as A with a pink outer glow
    • Yields
      • Air Mote
    • Low chance to get the following:
      • Shocking Lodestone
      • Sliver, Shard, Chunk of Thunderstone
  • Blightcrag
    • Marked on map as D with a pink outer glow
    • Yields
      • Death Mote
    • Low chance to get the following:
      • Putrid Lodestone
  • Earthcrag
    • Marked on map as E with a light green outer glow
    • Yields
      • Earth Mote
    • Low chance to get the following:
      • Loamy Lodestone
  • Lifejewel
    • Marked on map as L with a purple outer glow
    • Yields
      • Life Mote
    • Low chance to get the following:
      • Gleaming Lodestone
  • Soulspire
    • Marked on map as S with a purple outer glow
    • Yields
      • Soul Mote
    • Low chance to get the following:
      • Crystalline Lodestone
  • Springstone
    • Marked on map as W with a light green outer glow
    • Yields
      • Water Mote
    • Low chance to get the following:
      • Freezing Lodestone

Wood / Logging
Custom map filters showing only ironwood, wyrdwood.

  • Ironwood
    • Marked on map with this color:     
    • Gatherable at 175, Tracked at 200
    • Low chance to get the following:
      • Softwood Tree Sap
      • Shard, Draught of Ironwood Sap
      • Wildwood
      • Barbvine
  • Wyrdwood
    • Marked on map with this color:     
    • Gatherable at 100, Tracked at 125
    • Low chance to get the following:
      • Softwood Tree Sap
      • Drop, Vial of Wyrdwood Sap
      • Sliver, Shard, Chunk of Wyrdwood Resin
      • Whisperwood
      • Quillbark

Plants / Harvesting
Custom map filters showing only hemp, silkweed, wirefiber

  • Hemp
    • Marked on map with this color:      
    • Yields
      • Fibers
    • Low chance to get the following:
      • Dead Dryad Vine
      • Drop of Azalea Nectar
      • Shadecloth
      • Phasefiber
      • Verbena Stem, Leaf, Flower
  • Silkweed
    • Marked on map with this color:     
    • Yields
      • Silk Threads
    • Low chance to get the following:
      • Dead Dryad Vine
      • Vial of Azalea Nectar
      • Verbena Stem, Leaf, Flower
      • Glintstrands
      • Scalecord
  • Wirefiber
    • Marked on map with this color:      
    • Yields
      • Wirefiber
    • Low chance to get the following:
      • Dead Dryad Vine
      • Draught of Azalea Nectar
      • Verbena Stem, Leaf, Flower
      • Blisterweave
      • Scalecloth

Foods
Custom map filters showing only blueberry, cranberries, honey, squash, turkey nest.

  • Blueberry
    • Marked on map as B
  • Cranberries
    • Marked on map as U
  • Honey
    • Marked on map as H
  • Squash
    • Marked on map as Q
  • Turkey Nest
    • Marked on map as I
    • Yields
      • Feathers
      • Egg

Other
Custom map filters showing only saltpeter.

  • Saltpeter
    • Marked on map with this color     

Magical Plants - gatherable at 30, tracked at 45.
Custom map filters showing only shockbulb, blightroot, earthspine, dragonglory, lifebloom, soulsprout, rivercress.

  • Shockbulb
    • Marked on map as A
    • Yields
      • Air Mote
    • Low chance to get the following:
      • Shockbulb Steam 
      • Shockbulb Leaf
      • Shockbulb Flower
  • Blightroot
    • Marked on map as D
    • Yields
      • Death Mote
    • Low chance to get the following:
      • Blightroot Stem
      • Blightroot Leaf
      • Blightroot Flower
  • Earthspine
    • Marked on map as E
    • Yields
      • Earth Mote
    • Low chance to get the following:
      • Earthspine Stem
      • Earthspine Leaf
      • Earthspine Flower
      • Sliver, Shard, Chunk of Enchanted Earth
  • Dragonglory
    • Marked on map as F
    • Yields
      • Fire Mote
    • Low chance to get the following:
      • Dragonglory Stem
      • Dragonglory Leaf
      • Dragonglory Flower
  • Lifebloom
    • Marked on map as L
    • Yields
      • Life Mote
    • Low chance to get the following:
      • Lifebloom Stem
      • Lifebloom Leaf
      • Lifebloom Flower
  • Soulsprout
    • Marked on map as S
    • Yields
      • Soul Mote
    • Low chance to get the following:
      • Soulsprout Stem
      • Soulsprout Leaf
      • Soulsprout Flower
  • Rivercress
    • Marked on map as W
    • Yields
      • Water Mote
    • Low chance to get the following:
      • Rivercress Stem
      • Rivercress Leaf
      • Rivercress Flower

Magical Creatures - tracked at 175.
Custom map filters showing only lightning beetle, blightmoth, salamander snail.

  • Lightning Beetle
    • Marked on map as A with a light orange outer glow
    • Yields
      • Air Mote
    • Low chance to get the following:
      • Lightning Beetle
  • Blightmoth
    • Marked on map as D with a        outer glow
    • Yields
      • Death Mote
      • Low chance to get the following:
        • Blightmoth Dust
    • Salamander Snail
      • Marked on map as F with a light orange outer glow
      • Yields
        • Fire Mote
      • Low chance to get the following:
        • Salamander Slime

    Dyes - marked on the map as X

    • Brown Prismabloom
      • Can only be found in Weaver's Fen in many different areas, we will be adding markers on this in the future.
    Fungus - mushrooms are very abounded, some maybe marked as J on the map.
    • Bumbleblossom
      • Can be found many different areas in Weaver's Fen, we will be adding markers on this in the future.

    Wild Life - can be found around landmarks, and in the plain biome areas
    • Bear
    • Sheep
    Misc

    Provisions can be found in this territory for cooking include the following:
    • Coconut
    • Lemon
    • Melon
    • Milk
    Tuesday, August 31, 2021

    Housing Guide

    House Guide
    This housing guide covers the different tiers, costs, max numbers of pets, storage and other information. Housing in New World is instance based which allows unlimited amounts of players to have the same house plot in settlements. The first house you purchase is half off so its recommended you buy the tier 4 plot in the settlement that you will be working out of mostly. Max amount of houses a player can have is three which unlock as you level up your character. At level 15 you gain the first house, level 35 is the second and 55 is the third. You can have all 3 houses in the same settlement or spread out in other locations.

    Housing Tiers

    Tier 1
    • Costs 5000
    • Fast Travel Cooldown: 240 minutes / 4 hours
    • Territory Standing Requirements: 10
    • Max Number of Total Housing Items without perks: 100
    • Max storage pieces: 1
    • Max number of pets: 5
    • Max number of lights: 4
    Tier 2
    • Costs 10000
    • Fast Travel Cooldown: 180 minutes / 3 hours
    • Territory Standing Requirements: 15
    • Max Number of Total Housing Items without perks: 125
    • Max storage pieces: 2
    • Max number of pets: 6
    • Max number of lights: 6
    Tier 3
    • Costs 15000
    • Fast Travel Cooldown: 150 minutes / 2.5 hours
    • Territory Standing Requirements: 20
    • Max Number of Total Housing Items without perks: 150
    • Max storage pieces: 3
    • Max number of pets:7
    • Max number of lights: 8
    Tier 4
    • Costs 20000
    • Fast Travel Cooldown: 120 minutes / 2 hours
    • Territory Standing Requirements: 30
    • Max Number of Total Housing Items without perks: 200
    • Max storage pieces: 4
    • Max number of pets: 8
    • Max number of lights: 10


    Housing Trophies

    Every house has 5 trophy slots that you can use to gain various bonuses to different activities in New World. You can stack trophy bonuses as long as they are not at the same residence. Here is the general bonus list that you can get currently in the game. You can craft each trophy with the furniture trade skill and each trophy has 3 tiers (t1, t2, t3).

    • Alchemy Bonus
    • Blacksmithing Bonus
    • Cooking Bonus
    • Engineering Bonus
    • Harvesting Bonus
    • Logging Bonus
    • Mining Bonus
    • Outfitting Bonus
    • Skinning Bonus
    • Luck Bonus
    • Fishing Bonus
    • ---------------
    • Ancient Damage
    • Angry Earth Damage
    • Beast Damage
    • Corrupted Damage
    • Lost Damage

    House Storage Chest Types

    • Hewn Log Storage Chest
      • Bonus
        • 200
      • Craft-able
      • Tier 1
    • Old Wood Storage Chest
      • Bonus
        • 225
      • Loot Drop
      • Tier 1
    • Moosy Rock Storage Chest
      • Bonus
        • 225
      • Loot Drop
      • Tier 1
    • Iron Storage Chest
      • Bonus
        • 300
      • Craft-able
      • Tier 2
    • Hunter Storage Chest
      • Bonus
        • 325
      • Loot Drop
      • Tier 2
    • Stone Storage Chest
      • Bonus
        • 325
      • Loot Drop
      • Tier 2
    • Hope Storage Chest
    • Booty Storage Chest
      • Bonus
        • 400
      • Loot Drop
      • Tier 3
    • Dynasty Storage Chest
      • Bonus
        • 400
      • Craft-able
      • Tier 3
    • Polished Marble Storage Chest
      • Bonus
        • 525
      • Loot Drop
      • Tier 4
    • Cursed Storage Chest
      • Bonus
        • 525
      • Loot Drop
      • Tier 4
    • Golden Steel Storage Chest
      • Bonus
        • 500
      • Craft-able
      • Tier 4


    House Tier Plot Maps

    Shows you the location of each house you can purchase and the tier level in the settlement. Click on the image to get larger image version.


    Everfall
    Housing tier grid for Everfall

    Windsward
    Housing tier grid for Windsward

    Monarch's Bluff
    Housing tier grid for Monarch's Bluff

    Cutlass Key's
    Housing tier grid for Cutless Keys

    First Light
    Housing tier grid for First Light

    Reekwater
    Housing tier grid for Reekwater

    Brightwood
    Housing tier grid for Brightwood

    Weaver's Fen
    Housing tier grid for Weavers Fen

    Restless Shore
    Housing tier grid for Restless Shore

    Ebonscale Reach
    Housing tier grid for Ebonscale Reach

    Mourningdale
    Housing tier grid for Mourningdale


    Housing Furniture / Decorate List
    This section is under developement, please check back at a later date!

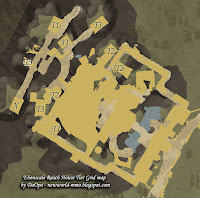
    Ebonscale Reach House Tier Grid map

    This is a map of all the various housing plots and tier level from the settlement in Ebonscale Reach. Use it to find the specific housing plot with the tier level that you want to invest.


    Housing tier grid for Ebonscale Reach
    Click on image to enlarge

    Housing Tiers

    Tier 1
    • Costs 5000
    • Fast Travel Cooldown: 240 minutes / 4 hours
    • Territory Standing Requirements: 10
    • Max Number of Total Housing Items without perks: 100
    • Max storage pieces: 1
    • Max number of pets: 5
    • Max number of lights: 4
    Tier 2
    • Costs 10000
    • Fast Travel Cooldown: 180 minutes / 3 hours
    • Territory Standing Requirements: 15
    • Max Number of Total Housing Items without perks: 125
    • Max storage pieces: 2
    • Max number of pets: 6
    • Max number of lights: 6
    Tier 3
    • Costs 15000
    • Fast Travel Cooldown: 150 minutes / 2.5 hours
    • Territory Standing Requirements: 20
    • Max Number of Total Housing Items without perks: 150
    • Max storage pieces: 3
    • Max number of pets:7
    • Max number of lights: 8
    Tier 4
    • Costs 20000
    • Fast Travel Cooldown: 120 minutes / 2 hours
    • Territory Standing Requirements: 30
    • Max Number of Total Housing Items without perks: 200
    • Max storage pieces: 4
    • Max number of pets: 8
    • Max number of lights: 10


    See other settlement house grids

    Everfall
    Housing tier grid for Everfall

    Windsward
    Housing tier grid for Windsward

    Monarch's Bluff
    Housing tier grid for Monarch's Bluff

    Cutlass Key's
    Housing tier grid for Cutless Keys

    First Light
    Housing tier grid for First Light

    Reekwater
    Housing tier grid for Reekwater

    Brightwood
    Housing tier grid for Brightwood

    Weaver's Fen
    Housing tier grid for Weavers Fen

    Restless Shore
    Housing tier grid for Restless Shore

    Mourningdale
    Housing tier grid for Restless Shore

    Restless Shore House Tier Grid map

    This is a map of all the various housing plots and tier level from the settlement in Restless Shore. Use it to find the specific housing plot with the tier level that you want to invest.


    Housing tier grid for Restless Shore
    Click on image to enlarge

    Housing Tiers

    Tier 1
    • Costs 5000
    • Fast Travel Cooldown: 240 minutes / 4 hours
    • Territory Standing Requirements: 10
    • Max Number of Total Housing Items without perks: 100
    • Max storage pieces: 1
    • Max number of pets: 5
    • Max number of lights: 4
    Tier 2
    • Costs 10000
    • Fast Travel Cooldown: 180 minutes / 3 hours
    • Territory Standing Requirements: 15
    • Max Number of Total Housing Items without perks: 125
    • Max storage pieces: 2
    • Max number of pets: 6
    • Max number of lights: 6
    Tier 3
    • Costs 15000
    • Fast Travel Cooldown: 150 minutes / 2.5 hours
    • Territory Standing Requirements: 20
    • Max Number of Total Housing Items without perks: 150
    • Max storage pieces: 3
    • Max number of pets:7
    • Max number of lights: 8
    Tier 4
    • Costs 20000
    • Fast Travel Cooldown: 120 minutes / 2 hours
    • Territory Standing Requirements: 30
    • Max Number of Total Housing Items without perks: 200
    • Max storage pieces: 4
    • Max number of pets: 8
    • Max number of lights: 10


    See other settlement house grids

    Everfall
    Housing tier grid for Everfall

    Windsward
    Housing tier grid for Windsward

    Monarch's Bluff
    Housing tier grid for Monarch's Bluff

    Cutlass Key's
    Housing tier grid for Cutless Keys

    First Light
    Housing tier grid for First Light

    Reekwater
    Housing tier grid for Reekwater

    Brightwood
    Housing tier grid for Brightwood

    Weaver's Fen
    Housing tier grid for Weavers Fen

    Ebonscale Reach
    Housing tier grid for Ebonscale Reach

    Mourningdale
    Housing tier grid for Restless Shore

    Weaver's Fen House Tier Grid map

    This is a map of all the various housing plots and tier level from the settlement in Weaver's Fen. Use it to find the specific housing plot with the tier level that you want to invest.


    Housing tier grid for Weavers Fen
    Click on image to enlarge

    Housing Tiers

    Tier 1
    • Costs 5000
    • Fast Travel Cooldown: 240 minutes / 4 hours
    • Territory Standing Requirements: 10
    • Max Number of Total Housing Items without perks: 100
    • Max storage pieces: 1
    • Max number of pets: 5
    • Max number of lights: 4
    Tier 2
    • Costs 10000
    • Fast Travel Cooldown: 180 minutes / 3 hours
    • Territory Standing Requirements: 15
    • Max Number of Total Housing Items without perks: 125
    • Max storage pieces: 2
    • Max number of pets: 6
    • Max number of lights: 6
    Tier 3
    • Costs 15000
    • Fast Travel Cooldown: 150 minutes / 2.5 hours
    • Territory Standing Requirements: 20
    • Max Number of Total Housing Items without perks: 150
    • Max storage pieces: 3
    • Max number of pets:7
    • Max number of lights: 8
    Tier 4
    • Costs 20000
    • Fast Travel Cooldown: 120 minutes / 2 hours
    • Territory Standing Requirements: 30
    • Max Number of Total Housing Items without perks: 200
    • Max storage pieces: 4
    • Max number of pets: 8
    • Max number of lights: 10


    See other settlement house grids

    Everfall
    Housing tier grid for Everfall

    Windsward
    Housing tier grid for Windsward

    Monarch's Bluff
    Housing tier grid for Monarch's Bluff

    Cutlass Key's
    Housing tier grid for Cutless Keys

    First Light
    Housing tier grid for First Light

    Reekwater
    Housing tier grid for Reekwater

    Brightwood
    Housing tier grid for Brightwood

    Restless Shore
    Housing tier grid for Restless Shore

    Ebonscale Reach
    Housing tier grid for Ebonscale Reach

    Mourningdale
    Housing tier grid for Restless Shore

    Brightwood House Tier Grid map

    This is a map of all the various housing plots and tier level from the settlement in Brightwood. Use it to find the specific housing plot with the tier level that you want to invest.


    Housing tier grid for Brightwood
    Click on image to enlarge

    Housing Tiers

    Tier 1
    • Costs 5000
    • Fast Travel Cooldown: 240 minutes / 4 hours
    • Territory Standing Requirements: 10
    • Max Number of Total Housing Items without perks: 100
    • Max storage pieces: 1
    • Max number of pets: 5
    • Max number of lights: 4
    Tier 2
    • Costs 10000
    • Fast Travel Cooldown: 180 minutes / 3 hours
    • Territory Standing Requirements: 15
    • Max Number of Total Housing Items without perks: 125
    • Max storage pieces: 2
    • Max number of pets: 6
    • Max number of lights: 6
    Tier 3
    • Costs 15000
    • Fast Travel Cooldown: 150 minutes / 2.5 hours
    • Territory Standing Requirements: 20
    • Max Number of Total Housing Items without perks: 150
    • Max storage pieces: 3
    • Max number of pets:7
    • Max number of lights: 8
    Tier 4
    • Costs 20000
    • Fast Travel Cooldown: 120 minutes / 2 hours
    • Territory Standing Requirements: 30
    • Max Number of Total Housing Items without perks: 200
    • Max storage pieces: 4
    • Max number of pets: 8
    • Max number of lights: 10


    See other settlement house grids

    Everfall
    Housing tier grid for Everfall

    Windsward
    Housing tier grid for Windsward

    Monarch's Bluff
    Housing tier grid for Monarch's Bluff

    Cutlass Key's
    Housing tier grid for Cutless Keys

    First Light
    Housing tier grid for First Light

    Reekwater
    Housing tier grid for Reekwater

    Weaver's Fen
    Housing tier grid for Weavers Fen

    Restless Shore
    Housing tier grid for Restless Shore

    Ebonscale Reach
    Housing tier grid for Ebonscale Reach

    Mourningdale
    Housing tier grid for Restless Shore